
Table of Contents
- What Textured Palette Knife Floral Art Really Involves
- Palette Knife Painting Supplies for Beginners: What You Actually Need
- Preparing Your Canvas and Mixing Paint for Dimensional Blooms
- Impasto Floral Painting Techniques: Building Petal by Petal
- Modeling Paste, Impasto Gel, and Other Texture Additives
- Drying, Curing, Varnishing, and Repairing Textured Palette Knife Floral Art
- Caring for Your Palette Knives and Photographing Finished Work
- Conclusion
- Frequently Asked Questions
Last Updated: September 25, 2026
What Textured Palette Knife Floral Art Really Involves
Textured palette knife floral art is a painting method where you apply thick, raised paint with a knife instead of a brush, building flowers that stand up off the canvas. The knife does two jobs at once: it shapes the petal and leaves a ridge of paint that catches light.
That ridge is the whole point.
A brush blends. A knife builds. Each stroke holds its shape, so a finished bloom looks sculptural rather than flat. This guide covers the supplies, the mixing, the layering, and the finishing steps.
Below, you'll learn how to build a flower petal by petal, even if you've never held a palette knife.
Palette Knife Painting Supplies for Beginners: What You Actually Need
The short answer: you need heavy body acrylics, two or three knife shapes, a stiff surface, and at least one texture medium. Everything else is optional.
A common mistake is buying a huge set of knives before you know which ones you'll actually reach for. Start small. Add tools once you know your habits.
Paints, Mediums, and Surfaces That Hold Texture
Soft-body acrylics slump and lose their peaks. Heavy body acrylics hold a stiff peak when you lift the knife, which is exactly what impasto work needs. If you only buy one upgrade, make it the paint.
For surfaces, pick something rigid.
You'll also want:
- Heavy body acrylics in your chosen palette
- At least one texture medium (see below)
- A spray bottle to keep paint workable
- A palette you can cover between sessions
- A palette knife cleaning rag kept separate from your painting rags
Texture Mediums: The Supply Most Beginners Skip
Most how-to guides stop at paint. That is a mistake, because texture mediums let you build height without burning through expensive heavy body acrylics. Three types matter for floral impasto:
- Modeling paste: Thick, matte, and opaque. It dries hard and accepts paint well, so it makes an excellent base layer where a large bloom will sit. Because it is cheaper per ounce than heavy body paint, you can build a half-inch of relief for a fraction of the cost.
- Heavy body gel (also sold as impasto gel): More flexible than modeling paste and slightly translucent when dry. It extends paint volume while keeping the color you mixed, so it is the better choice for the petals themselves rather than the base.
- Light modeling paste: A lighter, airier version of standard modeling paste. It holds a peak but weighs less, which matters on large canvases where heavy layers can stress the support.
Knife Shapes and What Each One Does
- Small pointed knife: tight petal tips and fine detail
- Medium trowel knife: the workhorse for most petals
- Large rounded knife: broad background strokes and big blooms
- Flat square blade: scraping and cleaning edges
Metal blades hold an edge and clean up easily but can rust if left wet. Plastic blades are cheaper and gentler on delicate surfaces but flex more under pressure, which makes consistent ridges harder. For floral work, a metal trowel in a medium size is the single most useful knife you can own.
Preparing Your Canvas and Mixing Paint for Dimensional Blooms
Preparation is short but it decides how the rest goes. Seal and prime your surface so it does not drink the oil out of your paint, then let it dry fully before you start.
Impasto Floral Painting Techniques: Building Petal by Petal
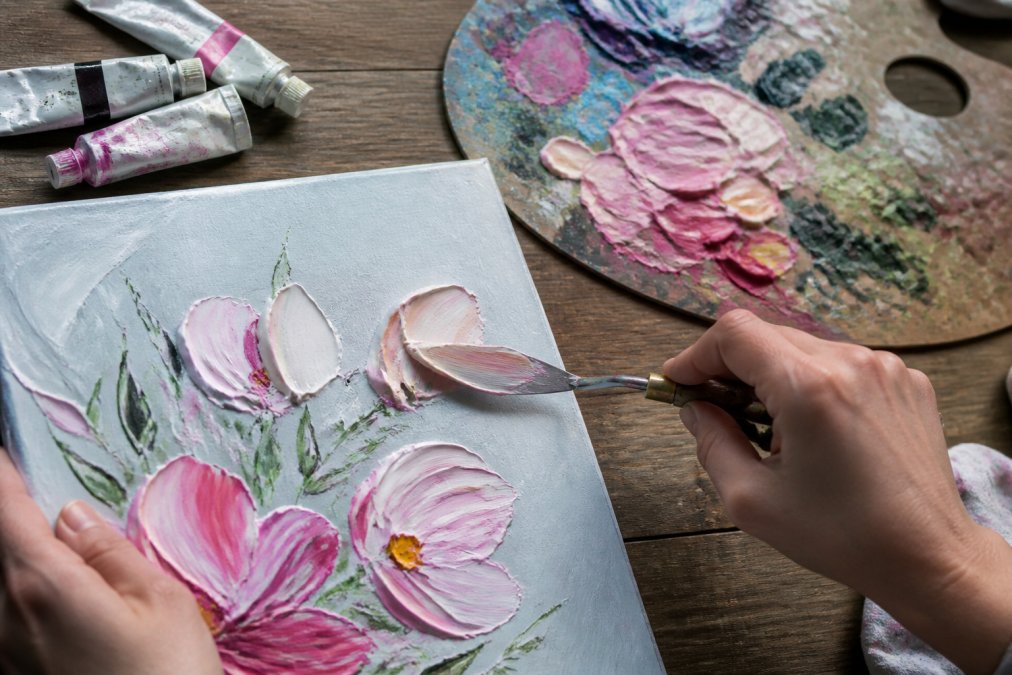
Impasto floral painting techniques come down to one move: press, drag, lift. You press the loaded knife onto the canvas, drag it a short distance, then lift straight up. The paint stays raised where you lifted.
Loading the Knife and Forming Petal Shapes
Load the knife, then place the blade at the outer edge of where the petal will sit. Press gently and pull inward toward the flower's center. Lift cleanly.
Petal shapes come from three variables:
- Pressure: light for a thin edge, firm for a fat ridge
- Length: short strokes for tight buds, long ones for open blooms
- Angle: tilt the blade to curve the petal as you pull
Layering for Depth, Highlight, and Shadow
Work back to front. Paint the background and the shadowed under-petals first, then build forward. Each new layer should sit slightly higher than the one beneath it.
Modeling Paste, Impasto Gel, and Other Texture Additives
Texture additives let you build height without using a fortune in paint. Modeling paste is thick and matte, and it dries hard, so it makes a good base for heavy petals. Impasto gel is more flexible and stays slightly translucent.
Drying, Curing, Varnishing, and Repairing Textured Palette Knife Floral Art
Thick paint dries from the outside in, so a heavy impasto piece can feel dry on the surface while the core is still soft. Give it several days in a dust-free spot before you varnish.
Caring for Your Palette Knives and Photographing Finished Work
Two things separate a hobbyist from someone whose work lasts and sells: how you treat your tools, and how you present the finished piece. Both are covered here because both are routinely skipped in beginner guides.
Palette Knife Maintenance and Cleaning
Acrylic is unforgiving. Once it hardens on a blade, it bonds to the metal, blunts the edge, and eventually pits the surface. The fix is simple: never let paint dry on a knife.
At the end of a session:
- Wipe off as much wet paint as possible while it is still soft.
- Wash the blade with warm water and a mild soap. Avoid hot water, which can soften the handle adhesive on cheaper knives.
- Dry the blade fully with a cloth. Do not air-dry metal blades, because water left in the joint between blade and handle is where rust starts.
- For dried acrylic, do not scrape with a metal tool. Soak the blade in warm soapy water for a few minutes, then lift the softened paint with a fingernail or a plastic scraper.
Lighting and Photographing Textured Art
A few practical points:
- Use one dominant light, not two. Two lights from opposite sides cancel each other's shadows and flatten the texture.
- Diffuse the light. A bare bulb creates harsh hotspots on glossy paint. A softbox, a white sheet, or a diffuser panel spreads the light and keeps highlights from blowing out.
- Shoot slightly off-axis. A camera positioned a few degrees off the light axis avoids the flat, dead-on look and lets the shadows do their work.
- Watch for glare. Varnished impasto reflects light unpredictably. If a ridge blows out to pure white, move the light a few degrees and reshoot.
- Include a scale reference. A hand, a coin, or a ruler in one frame communicates the actual height of the paint, which a flat photo cannot convey on its own.
If you would rather hang the finished result than paint it, Emma Bell Fine Art offers original textured floral paintings and fine art prints. Pieces like Candy Crush Abstract show what heavy palette knife texture looks like at scale, and Floral Persuasion offers a dimensional feel in a print.


Conclusion
Building a textured floral painting takes practice, and the first few petals rarely look the way you pictured them. Keep your paint thick, your layers patient, and your knife clean.
Frequently Asked Questions
What type of paint is best for textured palette knife floral art?
Heavy body acrylics work best because they hold stiff peaks and keep the sculptural shape of each petal. Standard acrylics are too thin and slump after application. You can thicken softer paints with modeling paste or impasto gel. For a slower working time, add a small amount of acrylic medium. Oil paints also hold texture well, but they take much longer to cure and require solvents. Most beginners get better results faster with heavy body acrylics on a primed canvas.
How do you create depth in palette knife floral paintings?
Depth comes from three things: layering, color temperature, and knife angle. Apply background petals first with flatter, thinner strokes, then build foreground blooms with thicker, raised paint. Use cooler, muted tones in the background and warmer, brighter tones in the foreground. Vary your knife angle so each petal catches light differently. Add a final highlight pass with a clean knife and a small amount of light paint to make the top petals pop forward.
How long does textured palette knife floral art take to dry?
Thick impasto layers can take anywhere from 24 hours to several weeks to dry, depending on humidity, temperature, and how much paint you applied. A thin underpainting may dry in a few hours, while a heavy petal built up with modeling paste could stay soft for days. Push a fingernail into an inconspicuous area to test. Wait until the surface is firm and no longer cool to the touch before varnishing. Rushing this step can trap moisture and cause cracking later.
What are the essential tools for textured floral painting?
You need a small set of palette knives in different shapes: a rounded blade for petals, a pointed blade for leaves and stems, and a flat wide blade for background texture. Add heavy body acrylics, a primed canvas or canvas panel, a palette for mixing, and a jar of water or acrylic medium. Optional but helpful: modeling paste for extra relief, a spray bottle to keep paint workable, and paper towels for wiping knives between colors. Start with three knives and expand as your technique develops.